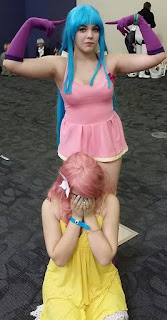
Morgiana's Dancer Veil
Isn't she cute?
I finally decided to make a dancer Morgiana costume! I was... am... a little nervous about it because of my weight, but a lot of people told me to do it and I REALLY want to do it. I had a hard time with this piece because I couldn't find any tutorials on this, and I had never made a veil before. I found a wedding veil pattern, but I didn't have enough material and I wanted to use all I had. I ended up asking my friend for the gold bits, so I saved a LOT of money there! Figuring this all out was very stressful and I can't wish that amount of stress on any one! I hope this tutorial makes it easy-ish for you to make it.
Part I: The Base (Un-decorated Veil)
Step 1: Gathering your materials:
For this you will need:
-Hot Glue Gun ($4 at Michaels)
-Head Band thingie ($1 at Dollar Stores)
-Gold Pleather ($10 - $20 / yd.) *cries*
- Blue Flower ($1 at Michaels or Dollar Stores)
-Pink Flower ($1 at Dollar Stores)
-Droopy Pink or Red Flowers ($5.99 at Michaels)
-Gold, White, and Black Thread
-Sewing Pins ($4.99 at Joann's and Walmart)
- 1 1/2 or 2 yds White Fabric
Step 2: Making the Gold Headband / Front:
This was made with gold pleather, gold thread, and black thread.
I measured it in a square / rectangle from the bottom lobe of one ear, to the bottom lobe of the other ear. After that, I have each side a 1 inch hem (I love my one-inch hems). Then, I rounded out the sides, but I didn't hem those so they wouldn't get smaller. You can hem it if you like. After heming it, I added black X's on it starting from the area that would be just above my eyebrows.
This was my first time working with pleather, and I learned something. Let me share that wisdom:
DON'T IRON IT
Especially if it has pins in it
I don't know if you can tell but it measures out to about 18 inches.
These measurements are after one inch hems.
Step 3: Making a Mock Up
I seriously suggest making a mock up for this! That way you make a pattern for yourself at the same time, and you don't ruin the material! For the pictures I used my mock up because I wanted to make sure I had made it right before I started taking pictures. Eventually I started using the actual one for the pictures so it changes from a floral print, to the white I have.
Material used: Both the mock up and the real one are made with a poly/cotton blend. Its the most common material found at Joann's in case you don't know what cotton/poly means.
A yard stick is shown here for comparison. I stand at 5'9" before shoes, and this measures out about 40 inches from top to bottom, which on me, goes from the middle of my head, to my butt. I cut this into a rectangle before rounding out the top.
This is about 18 inches across. It's cut off because it just goes into a square shape from there. As you can see I rounded it out at the top as best as I can. This extends from shoulder to shoulder on me, which is about where Morg's is in the show. I just kind of did my best here.... There wasn't really a method to this.
Step 4: Gathering the Top (Rounded Bit):
This part was a total experiment. I really did not know what to do, and every time I tried to connect it to the gold part it kept flaring out and looked a lot like Ja'far's hat, which I did not like. So it took me about two days to figure this out.
Someone a long time ago (when I was working on my Sinbad Cosplay) taught me how to make sleeves. One thing you do is to gather them. It makes the sleeves rounded so you can sew them on to shirts or what have you.
What this does for the veil, is it makes a sort of cap that goes on your head. It wont stay well (you'll see below how I fixed that with hot glue and a headband), but it makes it not flare out.
Just in case someone doesn't know how to do that, I'll try to explain it. I have no idea how to do it by hand sewing, so if you don't have a machine or know how to use one, you might want to check out your local library or Women's Center, or ask a friend.
What you do is, you set your stitches to the widest width and the longest length, and set your tension to a medium. For mine (a Kenmore), this was a 5 width, and a 5 length on my dials, and a tension # 4. Machines are different so however you do yours, you do. Kenmores typically go up to 5 on separate width and length dials. Brothers should be set to about a 12. You basically want a really long stitch.
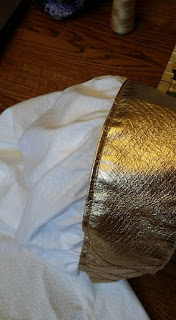
Put your material on the machine, and place the foot (the thing that holds down the material so the needle can get to it) at the beginning of where you rounded it, and sew all the way to the end of where you rounded it. The material will get bunched up, and this is what you want. Do not pull on the material or try to flatten it out or you'll ruin the cap effect. Once you get it off your machine, this is what it should look like:
The edge of the material under neath looks like a ruffle.
After that, you can pin your gold part to the top and sew it on with your gold thread. Sorry I don't have a picture of that part, but I thought it was pretty self explanatory.
Here's my Gold Head Band part sewn to the white material.
After this, I took a silver colored headband an glued it with hot glue on to the part where the white connects to the gold. That's how I keep it from falling off of me!
Here is our base veil in all its glory.
Part II: Decorating it
Step 5: Decorating Materials:
You'll need:
-Red and/or Pink Droopy Flowers, a Blue Flower (mine was a clip :O), and a pink flower, and some hot glue.
Step 6: The Decorating part!
Basically I just hot glued everything together. I cut about four 9 inch lengths or the droopy flowers and glued two of them to each flower. Then I glued each flower to the headband where I wanted it.
See how I glued the droopy/hanging flowers to the bigger flower?
After that, you're pretty much done unless you need to make some minor adjustments.
Et, Fini!
Morgiana Gif [Photograph]. (2012, October). Magi: Labyrinth of Magic In S. Ohtaka (Author).


