Friday, May 27, 2016

Magi Cosplay Tutorial: Paimon Staff

Magi Cosplay Tutorial: Paimon Staff

(Image Copyright A-1 Pictures, and is not mine)

Alright everyone, it's Sael with another Magi tutorial! Not a surprise by now, is it? 

So, this one is actually really simple. I based it off of a design from the Paimon Fan that I got from a friend. My idea isn't 100% accurate, but it's about 99% accurate. 

Step 1: Materials, the Gathering

This actually didn't take that many supplies, and of course I was quite pleased by this. 

-Hot Glue gun (and sticks)
-Sculpey brand modeling clay ($6 at Walmart for a LOT. Alternatively, you can get play doh, or Model Magic)
-PVC pipe
-Black Spray Paint (any cheap $1 kind)
-Gold Spray Paint (mine is Maxx metallic gold by Krylon)
-3 sheets of craft foam
-lots of white feathers
-Either construction paper, or folded over printer paper, or 3 sheets of binder paper that you glued together
-permanent marker
-scissors or X-Acto knife ($2 @ Walmart)
-3 red circular acrylic gems (or 2 circular ones, and one large oval one which I've never been able to find.

I measured the PVC pipe to about breast-height. I didn't want this thing to be too tall so I could carry it around con easier, and if I ever wanted to sell it, it wouldn't be too big for a short person. (Remember, I'm almost 6-feet tall!) 

If your pipe is dirty (like, DIRTY dirty) then scrub it clean. Large amounts of dirt can interfere with any plans. 

Finding a full picture of the staff is hard! I finally found one, but one part I couldn't figure out how to do, so I just left that small part out (it was at the bottom anyways). Here's my vague design in case you wanted it!


Step 2: Cutting Designs

So, The first thing I did was figure out where I want to put the designs on it. There are at least 6 rings (I added an extra, and I'll explain why in a bit). Measure your pipe with a measuring tape and then measure it out 4 times onto a sheet of craft foam. I made two of mine 2 inches wide, and 2 1/2 an inch wide because I thought it would look good. No problems if you make them all the same size. How you want to put them on is up to you! 

As for the canon design, there are 2 rings right on top of each other at the top, and 3 inches after that, are two more right on top of each other. Then, there are two 4 to 6 inches from the bottom. 


The Rings are in red. There's four large ones at the top, and two towards the bottom


After that, I cut out the trident looking parts that go with the feathers. I got one half of a page of news paper (hamburger style) and drew out a vague trident shape on one half, which a large stem at the bottom as an insert for the pipe. After that, I traced it in sharpie, folded it in half, and cut it so I had two equal sides (all one piece!) without accidentally having a "lucky side" (aka a smaller half that didn't match). Put these aside, because you'll be putting them on separately. 


Next, you'll take your printer paper or what have you, and cut out the vague shape of the feathered part. This will help you keep the feathers in place and in the shape of the metal vessel without having to buy 100+ feathers to try to filly up a butt-ton of empty space! This should be larger than the trident things!


Step 3: Clay Time!

Now, grab your clay (whatever kind you used) and try to make the point at the end of the staff (the same as at the end of the fan). For added points, push the clay into the end of the pipe so that an insert is created to make gluing easier later on. 

This is pre-baked. It will look the same when baked.


If you need to bake it, be sure to bake it appropriately. I ended up baking mine 20 minutes (Sculpey is 15 minutes per 1/4" thickness. If you don't know what temp to bake it at, I did mine at 300 F if you'd like to try that. 

Play Doh doesn't need to be baked. Just leave it out for a long time!

*Note: If you bake it, it will shrink a bit!

After it cools, just put a glob of glue all around it and push it in and hold it for a minute or so until it doesn't try to come back out any more. After putting it in, I put another ring of craft foam around it because the clay shrank and it looked weird. 

Step 4: Painting!

Now, you can take it and spray paint it black! Also spray paint any seperate pieces that will eventually be gold, but don't attach them to the pipe or you'll end up with gold feathers too!

After it dries (about all night??) you can spray paint them all gold.

Step 5: Feathers!

Now, on your feather cut out, you'll want to decide which way you want your feathers to go. Do you want them all going one way? Different directions?
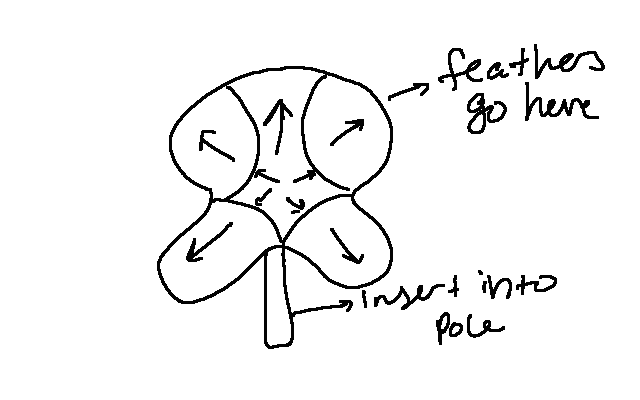


Once you figure out what you want, just start gluing them on. 

After that, put glue on the trident looking things, and put those on either side of the feathers. 

Hopefully things will be covered up! 

Fix up as you see fit, and then you're a Great Magician!


Sunday, March 13, 2016

Obligatory Saccon 2016 Post

Hey everyone, it's Sael!
I finally got back from two days of Saccon as Sinbad! I wore a purple Sari dress that I had for about 10 years in the bottom of a box, and it was so much fun to wear! I had to pin it to myself though so it wouldn't flip around. And trying to keep it out of the rain was very hard! I got a lot of compliments (and one person smelled me... O.O;) so it was a huge confidence boost. Everyone really seems to like it, so I keep wearing it!

I also got the chance to meet my two favorite cosplayers (and my third favorite, but we had already met) so that was amazing!

I took a lot of photos, so here they are. I loved all the creativity! There were some seriously cool people and lots of amazing takes on cosplays! It makes me feel like mine wasn't creative enough, but I still like mine.

If anyone is in these, and would like me to link the photo to a webpage, then I will~ Just let me know (somehow) what url you want it to link to and I'll make it happen~


I found a wild Darthnancy from Generation of Cosplay! 


So, yeah. I wish I had something cool to say at this point, but it was a lot of fun! I wish I could go to more cons, but school keeps me soooooo busy! I did however finish a cosplay the fist day of con, but it was raining so I didn't wear it. I'll make another post so you can all see it and my overweight glory~

Tuesday, March 8, 2016

Magi Cosplay Tutorial: Morgiana's Veil

Morgiana's Dancer Veil


Isn't she cute?

I finally decided to make a dancer Morgiana costume! I was... am... a little nervous about it because of my weight, but a lot of people told me to do it and I REALLY want to do it. I had a hard time with this piece because I couldn't find any tutorials on this, and I had never made a veil before. I found a wedding veil pattern, but I didn't have enough material and I wanted to use all I had. I ended up asking my friend for the gold bits, so I saved a LOT of money there! Figuring this all out was very stressful and I can't wish that amount of stress on any one! I hope this tutorial makes it easy-ish for you to make it. 

Part I: The Base (Un-decorated Veil)

Step 1: Gathering your materials:

For this you will need:

-Hot Glue Gun ($4 at Michaels)
-Head Band thingie ($1 at Dollar Stores)
-Gold Pleather ($10 - $20 / yd.) *cries*
- Blue Flower ($1 at Michaels or Dollar Stores)
-Pink Flower ($1 at Dollar Stores)
-Droopy Pink or Red Flowers ($5.99 at Michaels)
-Gold, White, and Black Thread
-Sewing Pins ($4.99 at Joann's and Walmart)
- 1 1/2 or 2 yds White Fabric

Step 2: Making the Gold Headband / Front:

This was made with gold pleather, gold thread, and black thread.

I measured it in a square / rectangle from the bottom lobe of one ear, to the bottom lobe of the other ear. After that, I have each side a 1 inch hem (I love my one-inch hems). Then, I rounded out the sides, but I didn't hem those so they wouldn't get smaller. You can hem it if you like. After heming it, I added black X's on it starting from the area that would be just above my eyebrows. 

This was my first time working with pleather, and I learned something. Let me share that wisdom:

DON'T IRON IT
Especially if it has pins in it

I don't know if you can tell but it measures out to about 18 inches.


These measurements are after one inch hems.


Step 3: Making a Mock Up

I seriously suggest making a mock up for this! That way you make a pattern for yourself at the same time, and you don't ruin the material! For the pictures I used my mock up because I wanted to make sure I had made it right before I started taking pictures. Eventually I started using the actual one for the pictures so it changes from a floral print, to the white I have.

Material used: Both the mock up and the real one are made with a poly/cotton blend. Its the most common material found at Joann's in case you don't know what cotton/poly means. 

A yard stick is shown here for comparison. I stand at 5'9" before shoes, and this measures out about 40 inches from top to bottom, which on me, goes from the middle of my head, to my butt. I cut this into a rectangle before rounding out the top.

This is about 18 inches across. It's cut off because it just goes into a square shape from there. As you can see I rounded it out at the top as best as I can. This extends from shoulder to shoulder on me, which is about where Morg's is in the show. I just kind of did my best here.... There wasn't really a method to this. 

Step 4: Gathering the Top (Rounded Bit):

This part was a total experiment. I really did not know what to do, and every time I tried to connect it to the gold part it kept flaring out and looked a lot like Ja'far's hat, which I did not like. So it took me about two days to figure this out. 

Someone a long time ago (when I was working on my Sinbad Cosplay) taught me how to make sleeves. One thing you do is to gather them. It makes the sleeves rounded so you can sew them on to shirts or what have you. 

What this does for the veil, is it makes a sort of cap that goes on your head. It wont stay well (you'll see below how I fixed that with hot glue and a headband), but it makes it not flare out.

Just in case someone doesn't know how to do that, I'll try to explain it. I have no idea how to do it by hand sewing, so if you don't have a machine or know how to use one, you might want to check out your local library or Women's Center, or ask a friend. 

What you do is, you set your stitches to the widest width and the longest length, and set your tension to a medium. For mine (a Kenmore), this was a 5 width, and a 5 length on my dials, and a tension # 4. Machines are different so however you do yours, you do. Kenmores typically go up to 5 on  separate width and length dials. Brothers should be set to about a 12. You basically want a really long stitch.

Put your material on the machine, and place the foot (the thing that holds down the material so the needle can get to it) at the beginning of where you rounded it, and sew all the way to the end of where you rounded it. The material will get bunched up, and this is what you want. Do not pull on the material or try to flatten it out or you'll ruin the cap effect. Once you get it off your machine, this is what it should look like:

The edge of the material under neath looks like a ruffle.

After that, you can pin your gold part to the top and sew it on with your gold thread. Sorry I don't have a picture of that part, but I thought it was pretty self explanatory. 

Here's my Gold Head Band part sewn to the white material. 

After this, I took a silver colored headband an glued it with hot glue on to the part where the white connects to the gold. That's how I keep it from falling off of me!

 Here is our base veil in all its glory. 

Part II: Decorating it

Step 5: Decorating Materials:


You'll need:

-Red and/or Pink Droopy Flowers, a Blue Flower (mine was a clip :O), and a pink flower, and some hot glue.

Step 6: The Decorating part!

Basically I just hot glued everything together. I cut about four 9 inch lengths or the droopy flowers and glued two of them to each flower. Then I glued each flower to the headband where I wanted it.

See how I glued the droopy/hanging flowers to the bigger flower?

After that, you're pretty much done unless you need to make some minor adjustments.


Et, Fini!

Morgiana Gif [Photograph]. (2012, October). Magi: Labyrinth of Magic In S. Ohtaka (Author).

Sunday, February 14, 2016

Magi Cosplay Tutorial: Yamuraiha's Hat

Magi Cosplay Tutorial: Yamuraiha's Hat

Alright, instead of being a responsible adult, I'm going to show you how I made Yamuraiha's hat for about $3! Also, because typing her name out is murder on my hands, she will be known as Yamu from now on. 


I don't know why I decided to cosplay her, especially since someone I know already does her, but hey, whatever, right? She's a really admirable character and I can't wait do finish her up! I wont be making the staff though since I have waaaaay too many props and I don't need any more. Really, I don't.

Let's get started!

Step 1: Materials


You will need:

- 1 witch hat
- Hot/cold glue gun (depending on how amazing you are)
- Floral Wire ($1 at Dollar Tree)
- Sewing needle
- Black thread (or whatever color you need for the hat)
- Black Hair Band thingie ($1 at the Dollar Store - or less at discount stores)

The hat I picked up today at a thrift store for $0.60, and the wire was only $1. If your Dollar Tree or other Dollar Store doesn't have floral wire, you can get bags of 10 2 ft lengths of floral wire at Joanns for like $2 which is a really good deal. I'm not sure how much the sewing needles are, but I got them for free from a relative.

I am in no way good at making hats, so I highly suggest just getting one at your local thrift store. Otherwise you'll spend $5 on a yard of Unicorn Buckram and heck-knows-how-much on the black material, and then you have to worry about getting the right kind and all that.

The one I have is made from a polyester. It flopped over and the cone would not stay up! So, being the cosplayer I am, I said, "I can fix that!" and fix it I did. And that's mainly what this tutorial is about. Making it stand up properly. 

Step 2: Use some wire

So now what you're going to do is flip your hat inside out.

Find the stitch along the backside where the two sides of the cone were sewn together.

Take your wire (Oh yeah, you'll need something to cut it with) and measure the length of that stitch and take off an inch so the wire doesn't poke through the top and create a hole when you wear it. 

Thread your needle

Put the wire along that stitch. I wish I could tell you the name of the stitch I used, but I made it up. I'm sure its a real stitch but I don't know what its called.

Basically, I used a slip stitch twice on top of each other every inch or so, and then pulled the needle through each thread that layed over the wire to create what looked like an X on the wire. This secures it in place. Continually tug at it a bit so you know it'll stay.

Extra points: Every 4 inches put a blob of hot glue there, but don't use the glue to glue the whole thing down or you'll ruin the hat and it'll look stupid.


I hope you can see that I made little X's over the wire. Remember the wire goes along the back so any fugliness stays in the back where the camera wont see.

After you do that, you'll notice your hat still wont stay up straight. That's fine.


Because when you put it on, that's when it will be up straight. By using the wire you can bend it to look like Yamu's hat. Surprisingly there's very few reference pictures for this! Basically it looks like a ratterrier ear where it stands up straight and then flops back at the point. You can also look at Aladdin's Season 2 hat. It's basically the same thing. Actually, if you're cosplaying Aladdin Season 2 then you can just use this method to make yourself a hat~

If any wires are sticking out, use the hot glue gun to put a dab on the ends to keep them down.

Turn your hat right side out.

Step 3: Add the Headband thingie

Now that the wire is in, put it on your head. Granted that it stays up, how does it fit? Is it snug? Is it loose? Now, Headbang. I do this with all my head gear (wigs, hats, etc) to make sure I can do ANYTHING I want without having to worry about much more than smoothing out my hair. If it stays on your head pretty well, you can skip this step. If it moves around and you don't like it moving around so much, this is where you need the headband.

Basically just sew it on with a bunch of slip stitches. Tug on it occasionally so you know it wont come off.


Here you can see my headband is firmly attached to my hat's brim. I sewed it onto the stitch that keeps the brim and cone-shape together.

Next, try it on and fix it til you like it! Bend the wire til you get the desired shape! Then, you're done!


I'm really bad at taking photos, but this is me wearing it. the end is curved back like Yamu's. Because the headband is black like the hat you can't see it! I also put it in at an angle which keeps it in place even more. 

As a further option, you can put another wire along the front in step 2, but I think this takes away from the natural look of Yamu's hat. I wanted it to look like it had a mind of its own.

Hopefully this was a simple thing to do for you! It took me about 20 minutes to do, so hopefully this tutorial will help you do it in even less time! :) 


Disclaimer: Image does not belong to me


Tuesday, January 5, 2016

Magi Djinn Equip Sword - Amon (Alibaba)

Alright! I've been sitting on this one for awhile, but school gets in the way and finally I have a chance to just sit down and do this thing.

This time around I'll show you how to make Alibaba's sword Amon from the anime Magi. It's pretty simple, and cheap! I think all in all it cost me around $10 to make, with the whole process taking about 4 days.

The Finished Project

Materials:
  1. A wooden Stake from Lowe's, OSH, Home Depot, or any other hardware store. Usually $1.50 USD (Make sure it measures at least 1 meter in length)
  2. Black Spray Paint (96c at Walmart)
  3. Silver acrylic paint
  4. Paint Brush
  5. Hot or low temp glue gun (hot is best, but either will do)
  6. Craft Sticks ($5 for a box of 400 at Walmart but we wont use that many)
  7. Binder Clips of all sizes $2 at Walmart
  8. Mod Podge ($varies)
  9. Sharpie and/or pencil
  10. School Glue (one whole large bottle
  11. About 46 sheets of white binder paper
  12. Something to smooth out the glue. You can use your finger, a paint brush, another paper folded in half....etc.
  13. Really good scissors. I got them for free from Harbor Freight
  14. Spackling. One entire small container $4
I really don't know why I put the gold spray paint there since I didn't use it... But that is my favorite brand. Rustoleum in case you cant read it. Its about $4-$5 but SO WORTH IT! Krylon is another good brand.

Step 1: Sizing

Now, normally you would want to size up how you want the sword. I ended up not needing to, because for someone who stands at 5'9" (me) it measures out to 1 meter exactly, which is how big the average wooden stake is. 

If you need to size it up, you simply look at a reference picture I used this one here. Then you get measuring tape and figure it out from there. You basically take your fingers (thumb and index) on Amon in the picture and measure it to Alibaebae's body. Then take the measuring tape and measure yourself in the same way.

Again, since this is done using the wooden stake I wont go into much detail with that.

Next, lay the stake on the ground. Then, get your stack of white printer paper and start folding them in half hotdog style (longways) and put them along the stake with one inch overlapping each one.

After you do that, you're going to take your glue and open up all those papers you just folded over. You're going to squirt a little glue on the inside, smooth it out and then fold it down again. It's going to be wet and soggy and that's good. You want that. Put it in the window sill or somewhere dry to ... well, dry. (Bonus points if you put them under a fan).

Now that you've figured out just how many you need to have in order to over the stake (leaving about an inch after the end of the stake on each side to cover it up later), you're going to glue them all together at the ends so they're overlapping each other by an inch or so. It will still probably be wet and soggy at this point, and it will be for while, so don't fret. DON'T ATTACH ANYTHING TO THE STAKE AT THIS POINT YOU WILL DO THAT LATER. 

You're going to do all that again for about 4 layers. Protip: To prevent it falling apart later, try putting the line of the previous row underneath the middle of the new row's paper. This makes it stronger. 

so like: New Row: ________    _____________      _______________
     Previous Row: _____   _______             ____________    _____________

With the spaces being the lines where they overlapped.

Step 2: Building the shape a bit

Now is where you need the reference again, because this time we need the shape! Amon likes to be easy, so this is a pretty easy sword to shape. You're going to figure out where the hilt is. Measure your hand out on the top/ where you want the hilt to be and add about... 5 inches? Or, you could use what I used, which is 10 inches. That includes the very tip of the hilt to the handle bar looking prominences because I don't know sword terms. 

Before you go trying to draw it on there with your sharpie/pencil from the hilt down, we're going to go straight to the bottom and make the end. If you notice, it isn't straight across, it goes at a slant like a slash. ---> /// Like those. So, starting at one corner on the bottom, draw a diagonal line. It's very slight, but noticeable. Don't let the bottom of the line go in more than an inch.  

Now get about 4 or 6 more papers all glued like before, only this time, you're folding it hotdog style TWO TIMES. Lay these perpendicular to the vertical line that is the body of the sword. Like before, you just glue them on however far about you want them to go. I just kinda guessed on it... but on mine they probably measure out to about 10 inches all the way tip of the left side to tip of the right side. 

Here I started making the .... horizontal things. Notice that I didn't cut anything yet. You can't see it but I drew the shape out.
After you have the line at the bottom all figured out, start drawing down from the hilt. I used the stake as a straight edge to keep my line straight. At the top use the full width of the paper, and SLOWLY work your way down and inwards. Never more than an inch. Seriously. You want this as wide as possible without taking away the canon size. After that just draw out the detail work.

After you have it drawn out, start cutting! You should make sure its mostly dry though or you'll rip it.

After that, you'll have to plug in your hot glue gun. You get to attach the stake! Whoohoo!

So basically, your stake should be able to fit right on top and you just have to glue it on. Pretty Swell right? I think it explains itself.


I had to take it in two shots but here's my stake on my paper sword.
After that dries, you're going to flip it over and start glueing on craft sticks. Not popsicle sticks, CRAFT STICKS. They are about as wide as a large thumb. Lay them on like you did with the paper so it stays strong.


Do this for about 4 layers. This will give it some dual-sided definition after you cover it.

Step 3: Covering

So, this is like the first step, only faster and easier. You take your paper and fold it HAMBURGER style. Only do enough to cover the sword with one layer. Glue like you did before. Then, put glue all over the area the paper is going to go and glue that sucker on! Then, each time you put a new paper on, you flip it over and you'll see some paper hanging over the edge. Put some glue on the other side and fold the edge hanging off on to it so that it lines the edge of the sword. Use binder clips to clamp it down so you don't have to hold it down all the time. Continue to do this on both side all the way down.


Here you can see that the colored binder clips are holding down the edges from the opposite side while I'm covering the side facing the camera. Make sure you glue down as much as you can to get as smooth and small and as much definition as you can.


The finished covering (above). Now, you may notice that you can press down on some parts, and its made of paper, which makes it soft and not hard. We will make it hard.

How?

WITH SPACKLING OF COURSE! (You can also use Guesso available at Walmart for $9 which is like paint and way easier to use. You just paint on like 5 layers of guesso and let it dry over night.)

So if you use the spackling method like I did because I wanted to try a new way to do this and thought it would be easier and it turned out it wasn't then pay attention! If not, then skip this part because guesso explains itself.

Spackling likes to come off, not be cooperative at all, and be a general pain in the you-know-what. But it pays off if you're willing to spend 2 hours putting it on one side. (4 hours total) Seriously my sword is rock-hard.

I like the kind that goes on pink and dries white. That way I know when I can continue!
The white it where I didn't get to it yet. It gets everywhere, so make sure you do it outside. I had to deal with an angry parent. It doesn't spread as easily as I thought it would, but do the best you can. Ger the main body, don't worry about the edges. 

After that, you sand it!

Super messy. Do it outside.
Step 4: Painting

Now that it's all spackled or guesso'd, you get to paint it!

If you're experienced in spray paint you'll think that enamel is the best to get because it comes with sealant in it, right? WRONG. I can't tell you how many scratches this thing got because I thought it would work that way. Nope. We're sealing it with Mod Podge.

So get any black spray paint you want.

Basically spray the heck out of it.

Now its black! Whoo!

Step 5: Deco & Deets

Get your reference pic again! Use your hot glue gun to draw out the Djinn Symbol on the sword. Mine ended up being lopsided, but I go to small cons, so I don't care much.


I painted over the glue with a mix of Metallic silver acrylic paint and regular silver paint. It gave a slightly better hue I think, but play around and see what you like. Use a sharpie to fix up any small boo-boos.

Technically his sword has it on both sides, but I only did it on one.

Step 6: Sealant

Use modpodge. It paints on pretty well. If you mess up and it dries with bubble on it, just spray pain and try again. And Again, And Again.


It dries clear - don't worry.

After that, it's ready for cons! You can -actually- hurt someone, so be careful. Please.